
I Built a Dedicated AI Command Terminal for My Desk (A Stream Deck for AI Agents, Powered by OpenClaw)
I built a dedicated AI command terminal that runs OpenClaw—like a Stream Deck for AI agents. Here’s the concept, the hardware list, the biggest hurdles, the UI design, and how I open-sourced the build so you can make your own.
The big idea: stop “chatting” with AI… start commanding it
Most AI tools force you into the same loop: type → wait → type → wait.
OpenClaw is different because it’s designed to be always on, checking for tasks, scanning signals, and doing background work. That’s when I realized something:
What if AI didn’t live inside another distracting app… and instead lived on my desk as a dedicated command console?
So I built one.
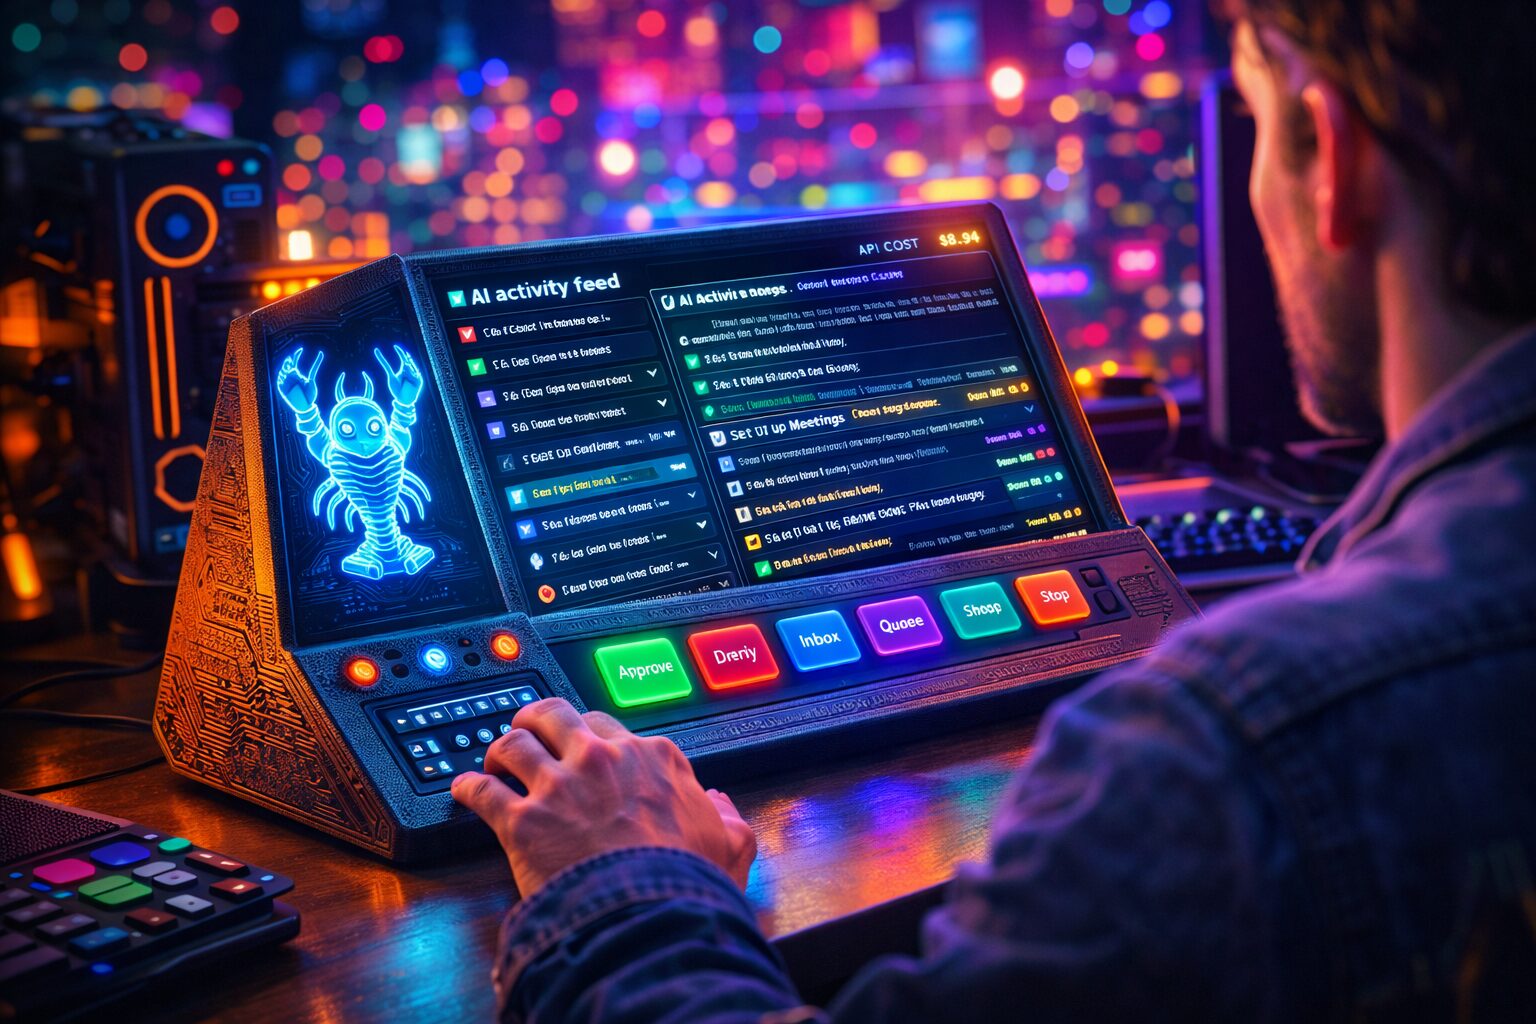
Think Stream Deck, but for AI agents:
-
A live “mission feed” screen (what the agent is doing right now)
-
A touchscreen action panel (approve/deny, run brief, inbox check, queue tasks)
-
A custom cyberpunk “mascot + status” UI so it feels like a real tool—not a hobby project
This $50 AI Command Center Runs My Life
What is OpenClaw (without the hype)
OpenClaw is free, open-source software you host yourself. You connect it to your tools (email, calendar, workflows), and it becomes an always-on assistant that can take actions on your behalf.
Yes, the internet is flooded with over-the-top AI hype. But underneath that noise, OpenClaw has one genuinely useful superpower:
It can run continuously and build up a queue of things that need attention.
That’s the seed that turned into this hardware build.
The concept: “Heartbeat → Queue → Command Terminal”
OpenClaw has a “heartbeat” pattern—periodic checks that can monitor things like:
-
urgent inbox items
-
overdue tasks
-
scheduled workflows
-
alerts and summaries
Instead of me initiating every conversation, I wanted the agent to:
-
accumulate signals
-
prioritize them
-
present them on a dedicated device
-
let me approve/deny or trigger action in one tap
So I built a desk terminal that works like a mini mission-control cockpit:
-
Big screen = live activity feed
-
Small touchscreen = action buttons + notifications
-
Physical controls = satisfying “operator” feel (buttons/knobs/encoder)
The hardware (budget build)
I wanted this to be cheap enough that anyone could try it without making it a “$500 AI toy.”
Here’s what I ordered:
-
Raspberry Pi 4
-
4-inch LCD display (for the live feed)
-
2.8-inch touchscreen LCD (for action buttons)
-
microSD card
-
push buttons + knobs (optional but fun)
-
protoboard / PCB (for a cleaner final build)
-
3D printed enclosure (or you can use any case)
Total cost: roughly $35–$50 in parts (not counting a 3D printer if you need one).
The hosting decision (and the security reality)
OpenClaw needs to run 24/7 like a server. That means you have two real options:
Option A: run it on your personal machine
Pros: simple, local, fast
Cons: high risk if it has access to your logged-in accounts, files, keys, etc.
Option B: isolate it
You run OpenClaw in a sandboxed environment that’s always on, separate from your personal life. That isolation reduces “blast radius” if anything goes wrong (bad config, risky skill, accidental exposure).
Whether you choose local or isolated, the point is the same:
Don’t treat an agent with tool access like a normal chatbot.
This entire desk terminal concept is partly about control:
-
fewer distractions
-
tighter workflows
-
clearer approvals
-
visibility into what the agent is doing
The insane hurdle nobody warns you about: displays + wiring
I thought wiring two small displays to a Raspberry Pi would be “a quick weekend.”
It was not.
These displays were designed with Arduino/ESP32-style assumptions. On the Pi, I ran into:
-
pin conflicts
-
driver quirks
-
interface mismatches
-
inconsistent screen refresh
-
touch input weirdness
My desk turned into a wire jungle fast.
But once I got:
-
the big display stable
-
the small touchscreen responsive
…everything changed. That was the moment it stopped being a “bunch of parts” and started becoming a product.
Building the UI: from Windows 98 → cyberpunk mission control
Text on a raw LCD looks terrible. It needed personality.
So I designed it like a “Pit Boy meets underground agent console” vibe:
-
left side: Space Lobster mascot in cyberpunk style (because why not)
-
right side: activity feed (inbox checks, tasks, automations, alerts)
-
small screen: six programmable buttons
-
Inbox
-
Daily Brief
-
Approvals Queue
-
Run Automation
-
Pause Agent
-
Emergency Stop
-
I also added one funny-but-real UI element:
a tiny “API cost” indicator
because “free open source” still becomes expensive if you spam premium models all day.
Designing the case: “make it feel real”
Wires held by random clips is… a vibe. Not a good one.
So I designed a wedge enclosure in Fusion 360:
-
cutouts for both screens
-
beveled faceplate to hide imperfections
-
cyberpunk edges + circuit pattern engraving
-
backplate for assembly
-
port cutouts for Raspberry Pi debugging
Then I printed it:
-
main body in matte PLA
-
accent bezels in translucent PETG for glow/color
For finishing:
-
sand + primer to reduce layer lines
-
metallic paint for a brushed metal feel
-
optional weights inside to make it feel premium
Result: it stopped looking like a project and started looking like a tool.
Live demo: why this is actually useful
This terminal isn’t just a display. It becomes a workflow.
Example buttons:
-
Inbox: pulls latest emails + flags urgent items on the big screen
-
Brief: generates the “today overview” and shows it instantly
-
Approvals: shows queued content/actions you need to approve
-
Custom actions: trigger scripts, call endpoints, or run automations
And the best part?
It builds up a catalog while you’re away—so when you sit down, you’re not doomscrolling Slack/Discord/Telegram to find what matters.
Your phone is already distracting enough.
This keeps agent work visible, actionable, and contained.
Why I’m open-sourcing this
Dedicated hardware for AI agents is still unexplored territory. Everyone is trying to stuff AI into every app. But a single-purpose desk device does something different:
-
It creates a ritual
-
It reduces noise
-
It makes approvals natural
-
It turns AI into a tool you “operate,” not a feed you get pulled into
So I open-sourced:
-
3D print files
-
UI code
-
wiring guide
-
assembly instructions
If you build one, I want to see it.
Final takeaway
OpenClaw is powerful, but most people use it like a chatbot.
This build flips the relationship.
Instead of “talking” to AI… you run it like an operator:
-
queue tasks
-
review activity
-
approve actions
-
ship faster
And you do it from a device that lives on your desk—ready for the next mission.
Leave a Reply